Introduction
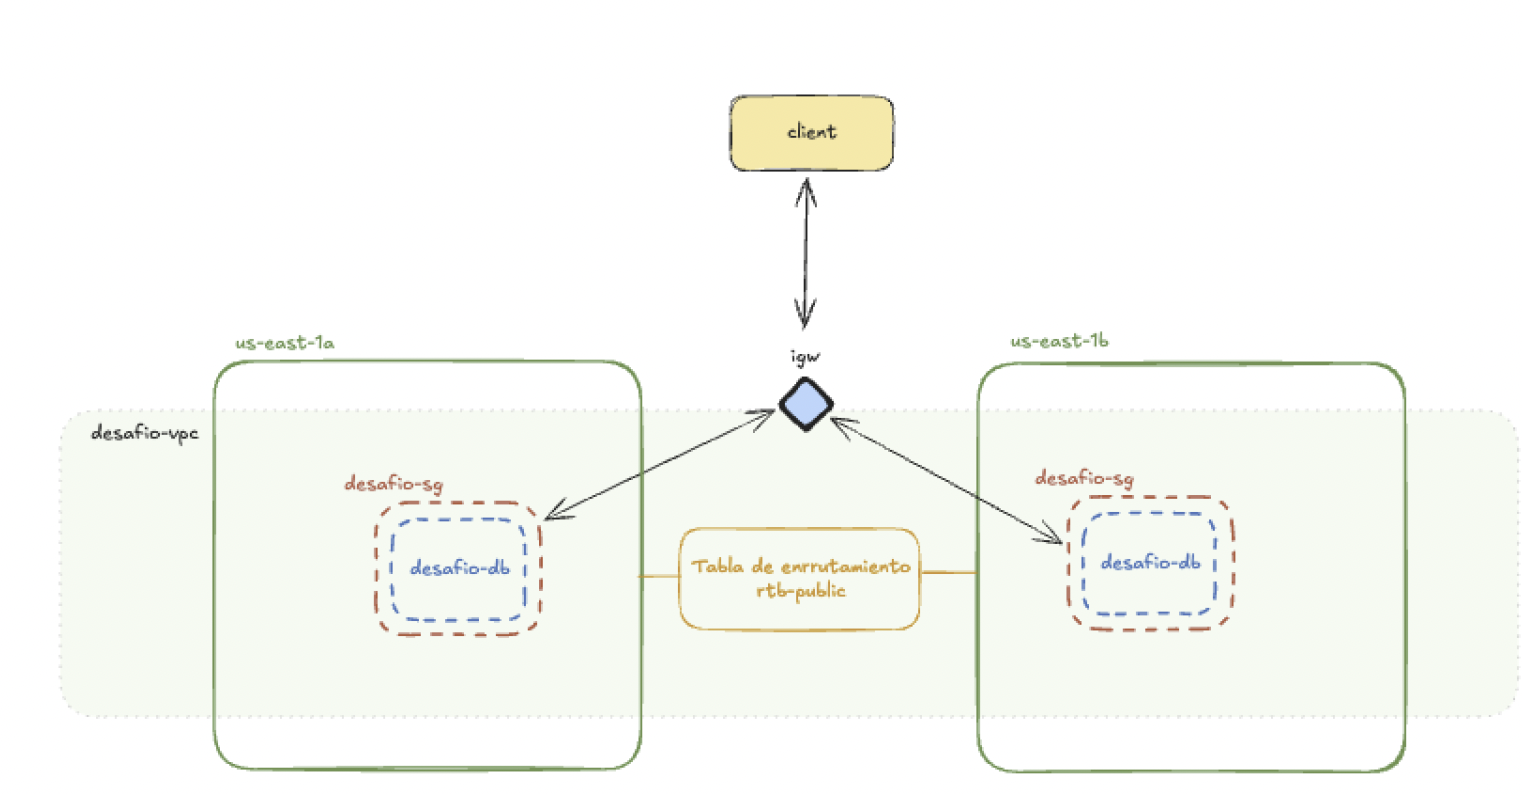
This project details the setup of a development environment in AWS. It uses a VPC for the network infrastructure, RDS for the MySQL database, and Security Groups and a Subnet Group to manage connectivity and security. A publicly accessible MySQL database was deployed within a custom VPC. Connectivity was validated using a Multipass instance.
Implementation Steps
The following steps detail the creation and configuration of the components in AWS using the AWS console, based on the specific implementation I carried out.
1. Creation of the VPC and Initial Components
- VPC
desafio-vpc:- I created the VPC named
desafio-vpcwith the IPv4 CIDR block:10.0.0.0/16.
- I created the VPC named
- Initial Public Subnet:
- The subnet created along with the VPC was named
desafio-public. - IPv4 CIDR block:
10.0.0.0/24. - Availability Zone:
us-east-1a. - I named the associated route table
rtb-public.
- The subnet created along with the VPC was named
- Additional Public Subnet:
- I created a second public subnet called
desafio-public2. - VPC:
desafio-vpc. - IPv4 CIDR block:
10.0.2.0/24. - Availability Zone:
us-east-1b. - Route Table Association: I associated
desafio-public2with the same public route table (rtb-public) asdesafio-publicto ensure both had internet access.
- I created a second public subnet called

2. Security Group Configuration
I created a new Security Group that allowed access from any IPv4 address and associated it with the desafio-vpc.
- I selected the
desafio-vpc. - I configured an inbound rule for all traffic with the source
0.0.0.0/0. This allows connection to the DB from anywhere on the Internet.

Aquí está la traducción de ambas secciones.
3. Creation of the Database Subnet Group
I created a database subnet group to be used with the database instance.
- I accessed the Amazon RDS console.
- I created a new DB Subnet Group.
- VPC:
desafio-vpc. - I selected the
us-east-1aandus-east-1bavailability zones and chose both public subnets (desafio-public,desafio-public2).
4. Launching the Amazon RDS Instance
I launched the RDS instance with public access.
- I accessed the Amazon RDS console.
- I selected the
us-east-1region, the same one where the VPC was created. For this sandbox environment, I did not use Multi-AZ replication, but rather a single Availability Zone, as this was the option enabled for this tier. - Database Engine: I selected MySQL.
- Template: I used the Dev/Test template because it is the one that allows for a sandbox environment.
- DB instance identifier:
desafio-db. - Instance size:
db.t3.micro. - Storage: 20 GB (General Purpose SSD).
- Credentials: I auto-generated a master password and saved it.
- Connectivity:
- VPC: I selected the created VPC (
desafio-vpc). - Public access: I selected Yes to be able to access the DB from any computer on the Internet.
- VPC security group: I associated the security group that I had previously created.
- VPC: I selected the created VPC (
- Enhanced monitoring: I disabled “Enable Enhanced monitoring” because the sandbox environment does not allow it.
- Finally, I created the database. I viewed the credential details, including the password and the instance endpoint address.

5. Connectivity Test with Multipass
Once the instance was created, I verified that I could access it using a Multipass environment. I installed MySQL and then tested the endpoint provided by the DB.
Install the MySQL client on the Multipass instance: sudo apt update
sudo apt install -y mysql-client- Connect to the RDS instance:

Diagram